


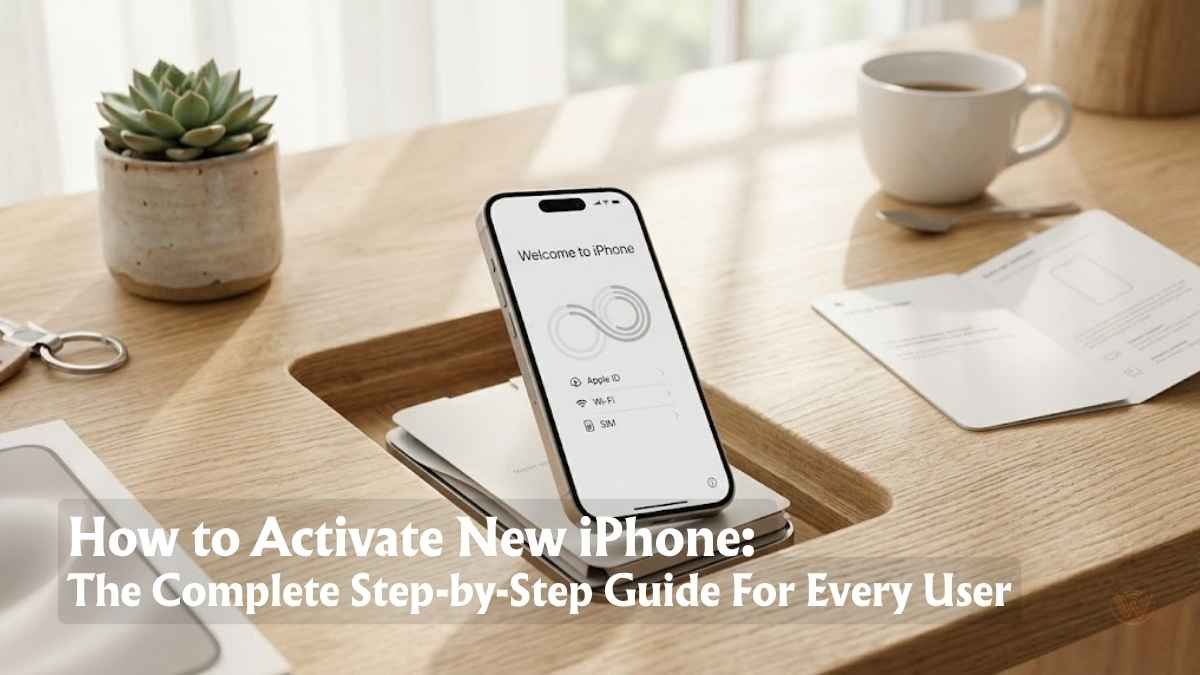
The First 10 Minutes With Your New iPhone Define Everything
Over 2.2 billion iPhones have been sold worldwide — yet millions of people every year find themselves staring at an activation screen, unsure what to do next. Whether you’ve just upgraded to an iPhone 16 or you’re picking up your first Apple device ever, the activation process is the critical bridge between “shiny new hardware” and a fully functional personal computer in your pocket.
- What You Need Before You Activate New iPhone
- How to Activate New iPhone: Step-by-Step
- How to Activate New iPhone Without a SIM Card
- How to Activate New iPhone Using iTunes or Finder (Mac/PC Method)
- Activating iPhone 16: What’s New in the 2024–2025 Setup Flow
- Troubleshooting: Common iPhone Activation Problems
- FAQ: How to Activate New iPhone
- The Bottom Line: Activate Your New iPhone the Right Way
Learning how to activate new iPhone correctly from the first boot isn’t just about convenience. It determines whether your data transfers smoothly, your apps restore correctly, your Face ID is configured for optimal security, and your iCloud is synced without gaps. Get it right the first time, and your new iPhone will feel like it already knows you.
This guide walks you through every screen, every decision point, and every setting — from the moment you power on your device to the second your home screen is ready to go.
What You Need Before You Activate New iPhone
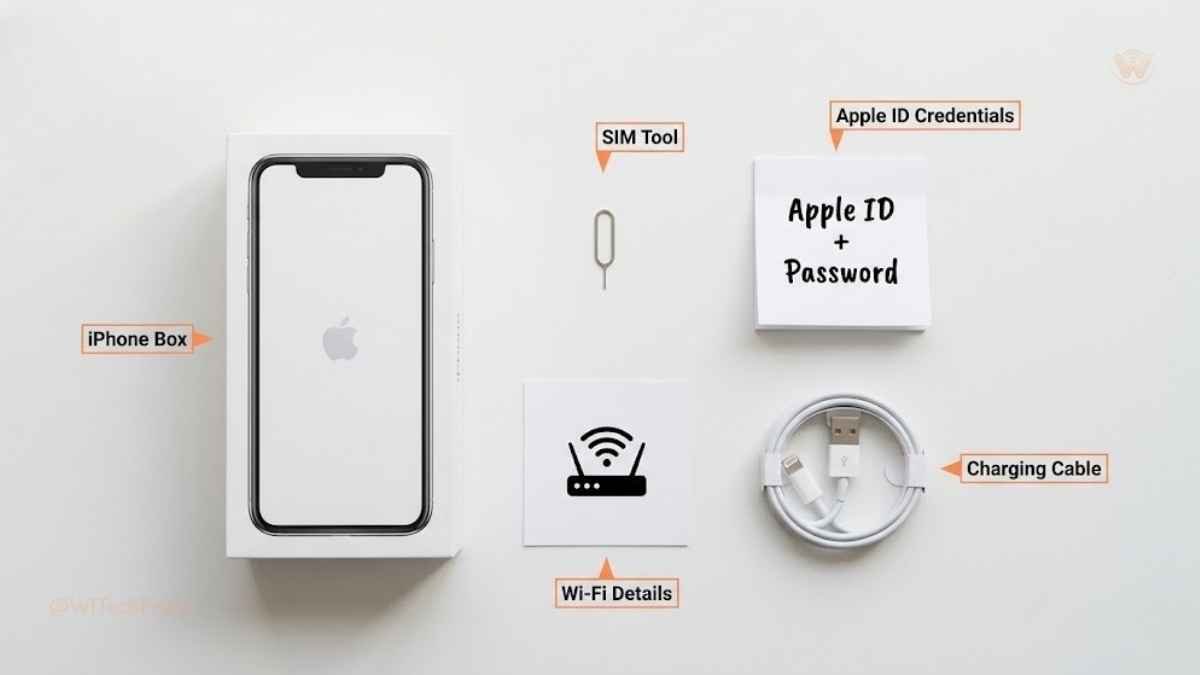
Before you press that side button, gather these essentials. Missing any one of them mid-setup can stall the process entirely.
- Your Apple ID and password — You’ll need this to sign in to iCloud, the App Store, and iMessage. If you don’t have one, you’ll create it during setup.
- A Wi-Fi network name and password — Activation requires an internet connection. Wi-Fi is strongly recommended over cellular for the initial setup.
- Your SIM card or eSIM carrier details — Physical SIM (nano-SIM for most models) or eSIM activation code from your carrier.
- Your old iPhone or iCloud backup — If you’re upgrading, have your previous device nearby for Quick Start, or ensure your iCloud backup is recent (Settings → [Your Name] → iCloud → iCloud Backup).
- A power source — Activation can take 20–45 minutes. Plug in your new iPhone to avoid interruptions.
- Your carrier account credentials — Some carriers require verification during SIM activation.
Pro Tip: Trigger a fresh iCloud backup on your old iPhone before starting the new one. Go to Settings → [Your Name] → iCloud → iCloud Backup → Back Up Now. This ensures the most recent data is available for transfer.
How to Activate New iPhone: Step-by-Step
Step 1: Power On Your New iPhone
Press and hold the side button (right edge on iPhone 6 and later) until the Apple logo appears. First-time activation is automatic upon powering on — you don’t need to unlock it first.
The “Hello” screen will appear in multiple languages. Swipe up (or press the Home button on older models) to begin.
Step 2: Select Your Language and Region
- Choose your language (e.g., English).
- Choose your country or region (e.g., United States).
This affects Siri’s voice, keyboard layouts, date/time formats, and the App Store’s regional catalog. Choose carefully — you can change it later, but it’s easier to get it right now.
Step 3: Connect to Wi-Fi or Use Cellular
You’ll be prompted to join a Wi-Fi network or use your carrier’s mobile data.
You May Also Like

Options presented:
- Join a Wi-Fi Network — Select your network and enter the password. Strongly recommended.
- Use Cellular Connection — Available if a physical SIM is inserted. Apple’s activation servers may throttle or delay over cellular.
- Connect to iTunes — Only if you’re activating through a Mac or PC via USB.
For most users: select your Wi-Fi network. Once connected, Apple’s activation servers verify your device automatically within seconds.
Step 4: Insert or Activate Your SIM Card
Physical SIM
Use the included SIM ejector tool to open the SIM tray (left side on most models). Insert your nano-SIM and replace the tray. The carrier signal should appear in the status bar.
eSIM Activation
If your iPhone supports eSIM (iPhone XS and later) and your carrier offers it:
- Select Set Up Cellular during setup.
- Choose Use QR Code (scan the carrier’s eSIM QR code) or Enter Details Manually.
- Follow your carrier’s on-screen steps to activate the eSIM digitally.
Note: iPhone 14 and later models sold in the United States are eSIM-only — no physical SIM tray. If you’re on a carrier that doesn’t support eSIM, you’ll need to switch carriers or request an eSIM transfer.
Step 5: Data & Privacy Notice
Apple displays a brief Data & Privacy screen explaining what information it collects. Tap Continue to proceed. No personal data is sent without your explicit permission later.
Step 6: Transfer Your Data — The Most Important Decision
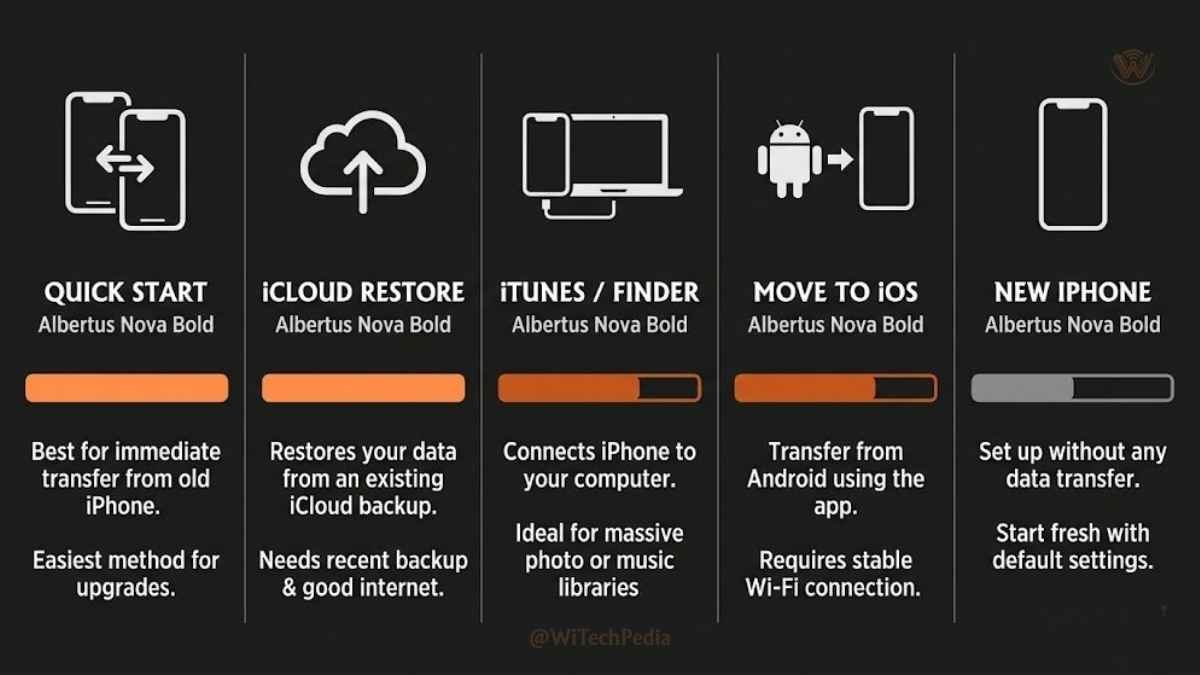
This is the most consequential step in the entire iPhone activation process. Choose wisely.
| Transfer Method | Best For | Speed | Requires |
|---|---|---|---|
| Quick Start (iPhone-to-iPhone) | Upgrading from another iPhone | Fast (10–30 min) | Old iPhone running iOS 11+ nearby |
| Restore from iCloud Backup | Upgrading, old device unavailable | Moderate (20–60 min) | Wi-Fi, iCloud backup |
| Restore from Mac or PC | Power users, large backups | Fast | USB cable, iTunes/Finder |
| Transfer Directly from Android | Switching from Android | Moderate | “Move to iOS” app on Android |
| Set Up as New iPhone | First-time users, clean slate | Fastest | Nothing |
Using Quick Start (Recommended for iPhone Upgrades)
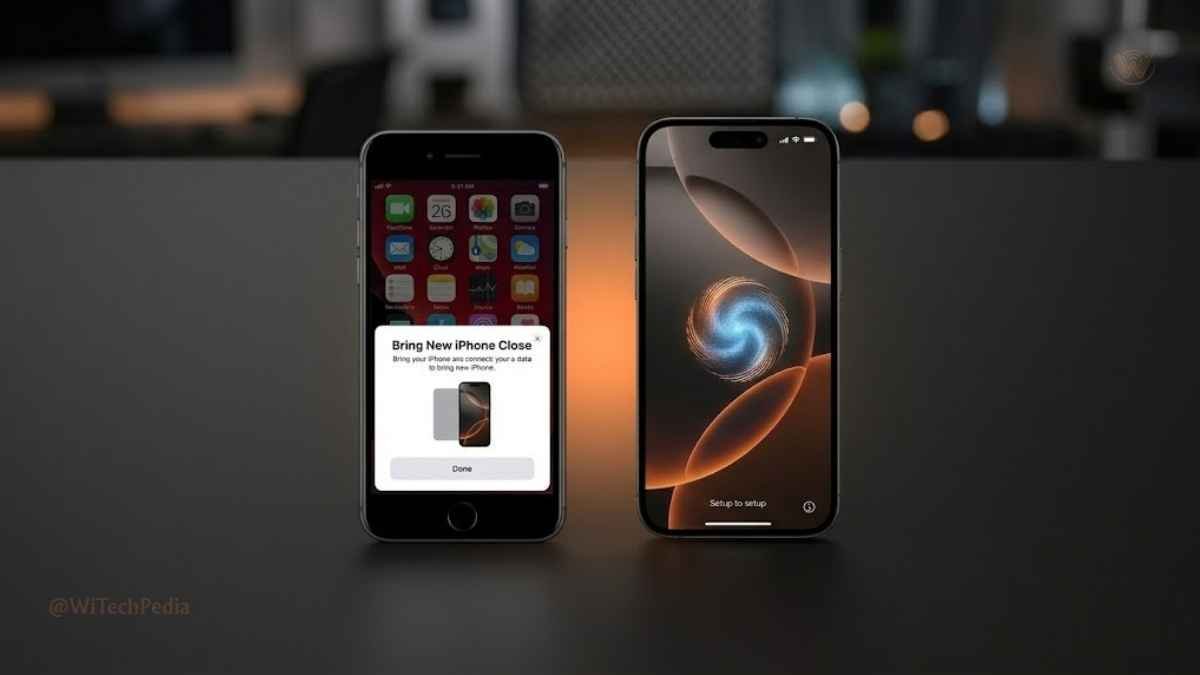
- Place your old iPhone near your new one.
- A Quick Start prompt will appear on the old device automatically.
- Use your old iPhone’s camera to scan the animated pattern shown on the new iPhone.
- Authenticate with your passcode or Face ID on the old device.
- Choose Transfer from iPhone (direct transfer, no iCloud needed) or Download from iCloud.
- Wait for the transfer to complete — keep both devices plugged in and close together.
Restoring from iCloud Backup
- Sign in with your Apple ID when prompted.
- Select Restore from iCloud Backup.
- Choose the most recent backup from the list.
- Wait for the restore to complete. Apps will continue downloading in the background after the initial setup.
Step 7: Sign In With Your Apple ID
Enter your Apple ID email and password. This step:
- Activates iCloud sync for contacts, calendars, photos, and notes.
- Links your App Store purchases.
- Enables iMessage and FaceTime.
- Activates Find My iPhone for device security.
If you’ve forgotten your Apple ID password, tap Forgot Apple ID or Password and follow the account recovery steps. You can also reset your Apple ID password on Apple’s website.
Two-Factor Authentication: If 2FA is enabled on your Apple ID, a verification code will be sent to your trusted device or phone number. Enter the 6-digit code when prompted.
Step 8: Set Up Face ID or Touch ID
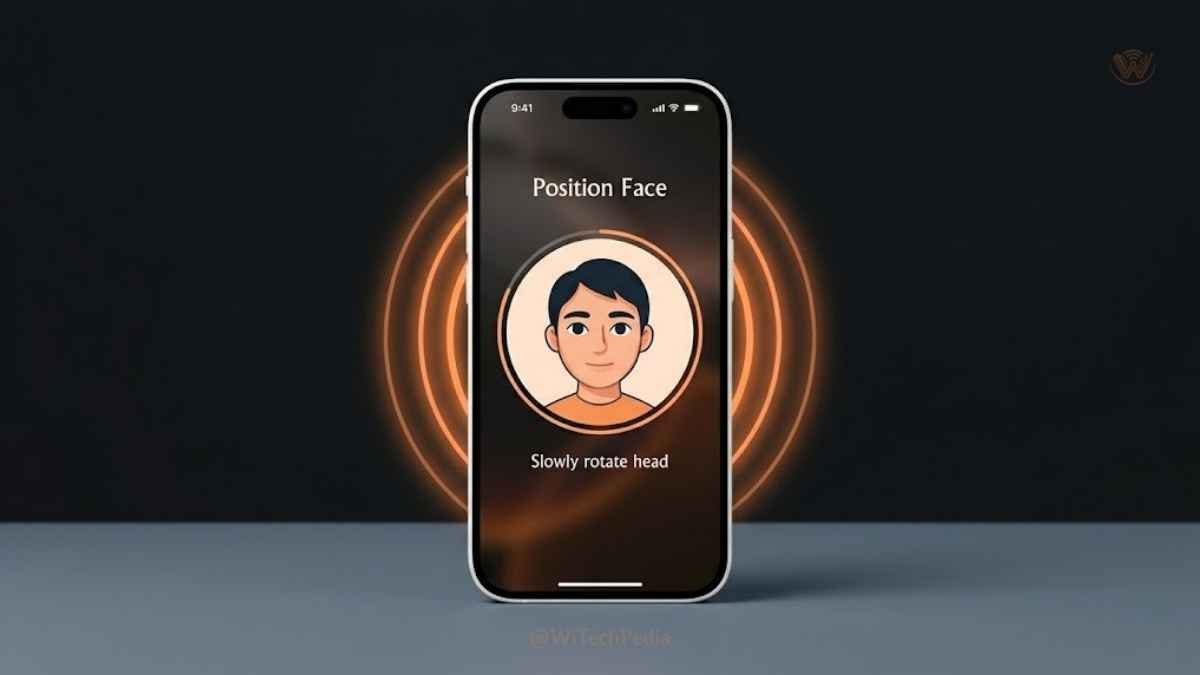
Face ID (iPhone X and later)
- Tap Set Up Face ID.
- Hold your iPhone at eye level, face centered in the frame.
- Slowly rotate your head in a circle as prompted — twice.
- Tap Continue to complete the second scan.
Touch ID (iPhone SE models)
- Rest your finger on the Home button repeatedly as instructed.
- Adjust grip and repeat to capture the full fingerprint.
- Set up an alternate fingerprint (optional but recommended).
Step 9: Create Your iPhone Passcode
Set a 6-digit passcode (recommended) or tap Passcode Options for:
- 4-digit numeric code
- Custom numeric code
- Custom alphanumeric code (most secure)
This passcode is your fallback when Face ID or Touch ID fails. Do not use obvious codes like 000000, 123456, or your birth year.
Step 10: Configure Apple Services
You’ll be walked through several optional but important settings:
- iCloud Drive — Sync documents and desktop files.
- Siri — Enable and train Siri’s voice recognition.
- Screen Time — Set daily usage limits (especially useful for families).
- App Analytics — Share crash data with Apple (toggle off if privacy-conscious).
- True Tone Display — Automatically adjusts white balance to ambient lighting. Leave On.
- Appearance — Choose Light or Dark mode.
Step 11: The iPhone Activation is Complete
Once you tap Get Started, your iPhone’s home screen loads. Congratulations — your iPhone is now fully activated and personalized.
Apps from your backup will continue downloading in the background. iCloud Photos will sync over Wi-Fi over the next few hours. Give it time — don’t panic if everything isn’t instant.
How to Activate New iPhone Without a SIM Card
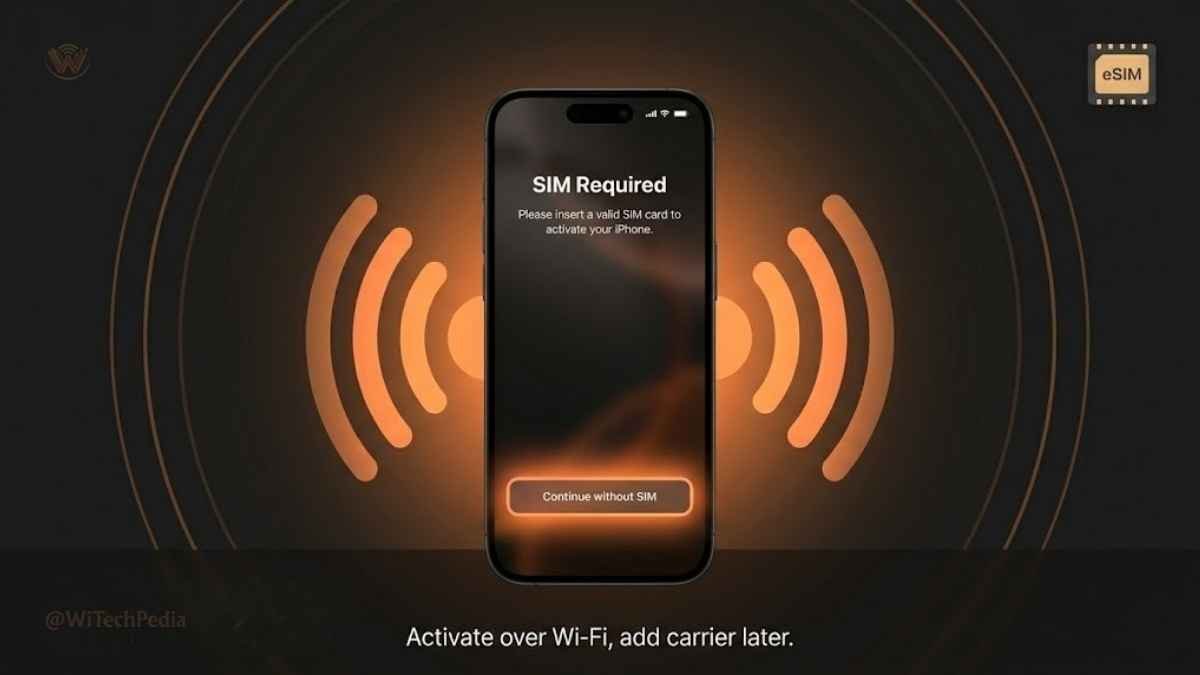
Yes, you can activate a new iPhone without inserting a SIM card, using Wi-Fi only:
- Power on the iPhone and connect to Wi-Fi when prompted.
- When the SIM card screen appears, tap Continue without SIM (available on iOS 15+).
- Complete the rest of the activation steps normally.
- Add a SIM or activate an eSIM later in Settings → Cellular → Add Cellular Plan.
This method is useful for iPod Touch replacements, Wi-Fi-only use, or testing a device before committing to a carrier plan.
How to Activate New iPhone Using iTunes or Finder (Mac/PC Method)
If your iPhone won’t connect to Wi-Fi or you prefer a wired setup:
- Install the latest version of iTunes (Windows) or use Finder (macOS Catalina and later).
- Connect your iPhone to your computer with a USB-C or Lightning cable.
- iTunes/Finder will detect the new iPhone and prompt you to Set Up as New iPhone or Restore from Backup.
- Follow the on-screen instructions to complete activation.
This method is also the fastest way to restore a large local backup (significantly faster than iCloud over Wi-Fi).
Activating iPhone 16: What’s New in the 2024–2025 Setup Flow
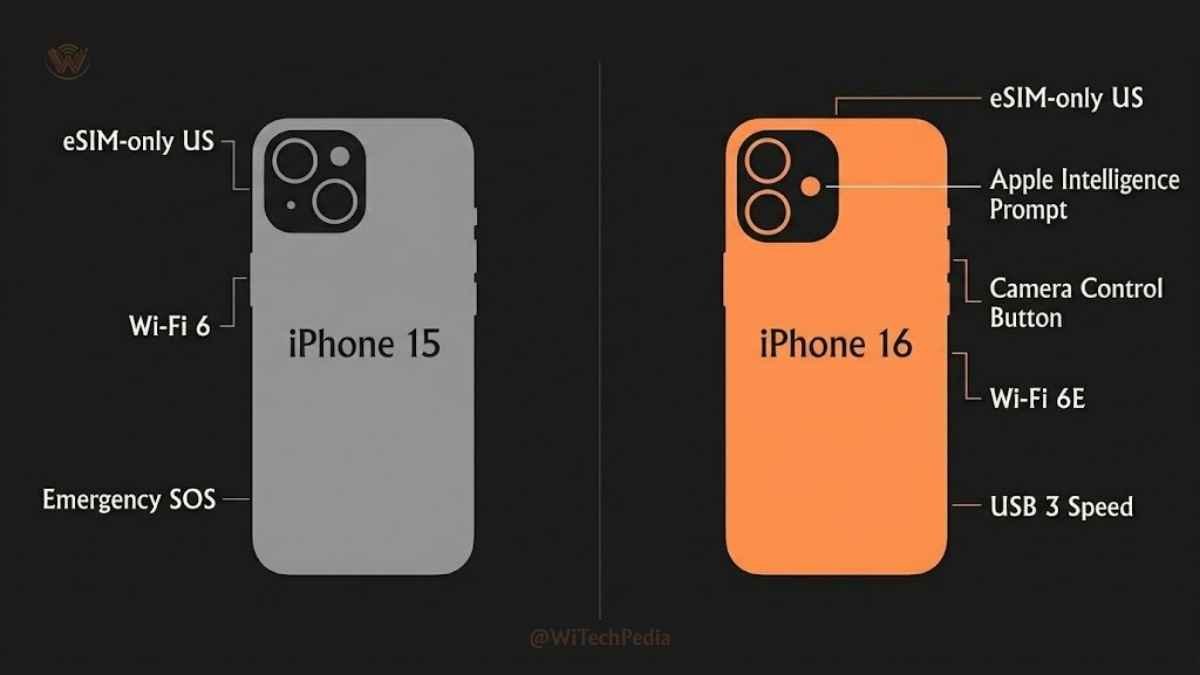
The iPhone 16 series introduced a few notable changes to the activation experience:
| Feature | iPhone 15 | iPhone 16 |
|---|---|---|
| Physical SIM support (US) | eSIM-only (US) | eSIM-only (US) |
| Quick Start speed | Wi-Fi or USB | Wi-Fi 6E / USB 3 speeds |
| Apple Intelligence setup | Not available | Setup prompt during activation |
| Camera Control button | No | Yes — configurable during setup |
| Satellite connectivity | Emergency SOS only | Emergency SOS + Roadside Assistance |
During iPhone 16 activation, you’ll see a new prompt to enable Apple Intelligence — Apple’s on-device AI suite. This requires opting in during setup and may not be available in all regions at launch.
Troubleshooting: Common iPhone Activation Problems
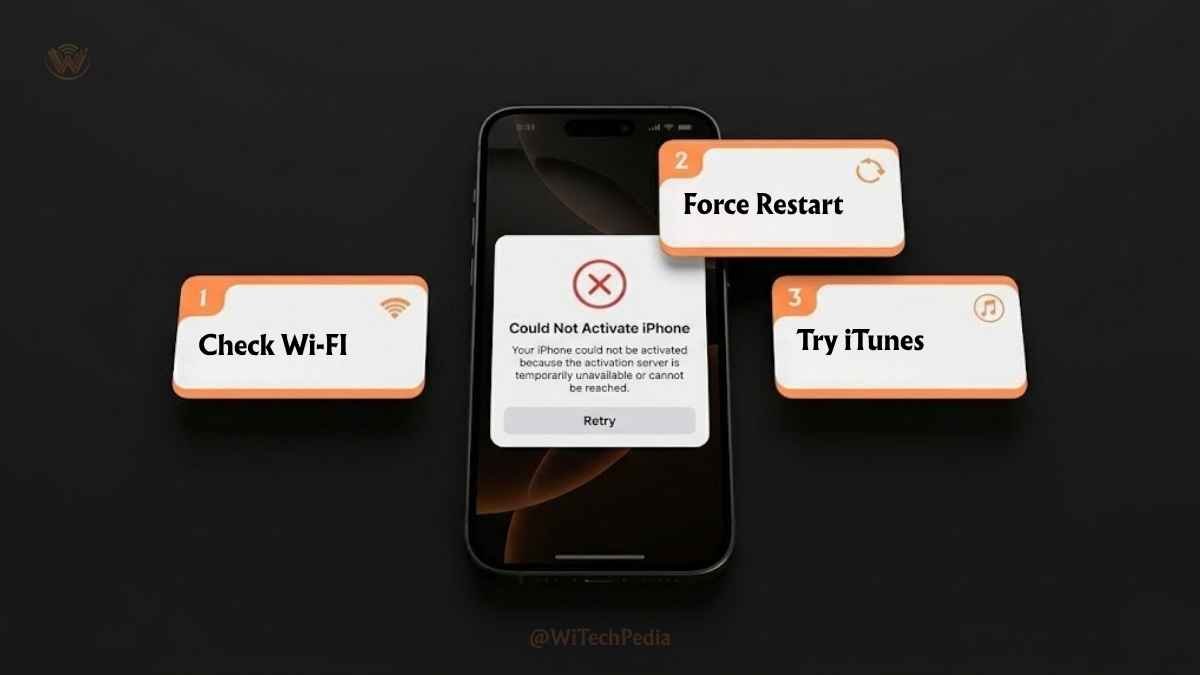
“iPhone Could Not Be Activated” Error
Causes:
- Apple’s activation servers are temporarily down (check Apple System Status).
- SIM card not properly seated.
- Device is carrier-locked to a different carrier.
Solutions:
- Try activating over Wi-Fi instead of cellular.
- Remove and reinsert the SIM card.
- Connect to iTunes/Finder and activate via USB.
- Contact your carrier to verify the device is unlocked.
iPhone Stuck on Activation Screen
- Force restart the iPhone:
- iPhone 8 and later: Press Volume Up → Volume Down → hold Side button until Apple logo.
- iPhone 7: Hold Volume Down + Side button.
- iPhone 6s and earlier: Hold Home + Side button.
- Reconnect to Wi-Fi.
- If still stuck, connect to iTunes/Finder on a computer.
“SIM Not Supported” or “SIM Card Failure”
- Ensure the SIM is the correct size (nano-SIM for most iPhones).
- Try a different SIM from the same carrier.
- Contact your carrier — the device may be locked or the SIM may be inactive.
Forgot Apple ID Password During Activation
- Tap Forgot Apple ID or Password on the sign-in screen.
- Use Account Recovery via a trusted phone number or email.
- Visit iforgot.apple.com from another device for full account recovery options.
iCloud Backup Not Showing Up
- Ensure the backup was made from the same Apple ID.
- Check that the backup completed: old iPhone → Settings → [Your Name] → iCloud → iCloud Backup → Last Backup.
- The most recent backup may take a few minutes to appear in the restore list.
FAQ: How to Activate New iPhone
What happens if I skip the SIM card step during iPhone activation?
You can skip the SIM card step and activate your iPhone using Wi-Fi alone. The device will function fully on Wi-Fi — calls and cellular data won’t work until you add a SIM or eSIM later. Go to Settings → Cellular → Add Cellular Plan to add service anytime after setup.
How long does iPhone activation take?
Initial activation with Apple’s servers typically takes under 2 minutes on a stable Wi-Fi connection. The full setup process — including data transfer from an old iPhone via Quick Start — takes between 20 minutes and 1 hour, depending on backup size and connection speed. Apps will continue downloading in the background after the primary setup is complete.
Can I activate a new iPhone without an Apple ID?
Yes. You can skip the Apple ID sign-in step during setup and tap Set Up Later in Settings. However, you’ll lose access to the App Store, iCloud, iMessage, FaceTime, and Find My. It’s strongly recommended to create or sign in to an Apple ID — it’s free and takes under 2 minutes to create.
How do I activate a second-hand iPhone that’s locked to a previous owner?
A second-hand iPhone locked to a previous Apple ID will display an Activation Lock screen. The previous owner must either:
- Sign out of iCloud before handing over the device (Settings → [Their Name] → Sign Out), or
- Remove the device remotely at icloud.com/find.
If you cannot contact the previous owner, Apple requires proof of purchase and may be unable to remove Activation Lock in all cases.
What is the difference between Quick Start and iCloud restore?
Quick Start transfers data directly between two iPhones over Wi-Fi or a USB-C cable — it’s faster, more complete, and doesn’t require an existing iCloud backup. iCloud Restore downloads your most recent iCloud backup over the internet, which is useful when your old device isn’t available. Quick Start is generally preferred for upgrades when both devices are present.
Do I need to activate my iPhone if I’m switching carriers?
Not exactly — if you’re keeping the same iPhone and switching carriers, you don’t need to go through the full activation process again. You’ll simply swap SIM cards or activate a new eSIM in Settings → Cellular. However, if you’re getting a new iPhone from the new carrier, you’ll activate it fresh following the steps in this guide.
Can I activate iPhone 16 without Apple Intelligence?
Yes. Apple Intelligence is optional and can be skipped during setup. You can enable or disable it later in Settings → Apple Intelligence & Siri. Note that Apple Intelligence requires an iPhone 15 Pro, iPhone 15 Pro Max, or iPhone 16 series device, and may not be available in all countries.
The Bottom Line: Activate Your New iPhone the Right Way
Learning How to Activate New iPhone and Setting up a new iPhone is one of the smoothest onboarding experiences in consumer technology — when you know what to expect. Here are the top takeaways from this guide:
- Back up your old iPhone to iCloud before starting — it takes minutes and prevents data loss.
- Use Quick Start if you’re upgrading — it’s the fastest, most complete transfer method available.
- Have your Apple ID credentials ready — Apple ID is the foundation of every iPhone feature.
- Wi-Fi is your friend — activate over Wi-Fi for speed, reliability, and reduced cellular data usage.
- Troubleshooting is simple — most activation errors resolve with a force restart or USB connection to iTunes/Finder.
Your new iPhone is more than a phone — it’s a productivity hub, creative studio, and security device all in one. Activating it correctly from day one ensures you get every bit of value from it.
📬 Stay Ahead With WiTechPedia
Want more guides like this? Subscribe to the WiTechPedia newsletter for the latest in Apple, Android, AI, and tech how-tos — delivered straight to your inbox. No spam, ever.