


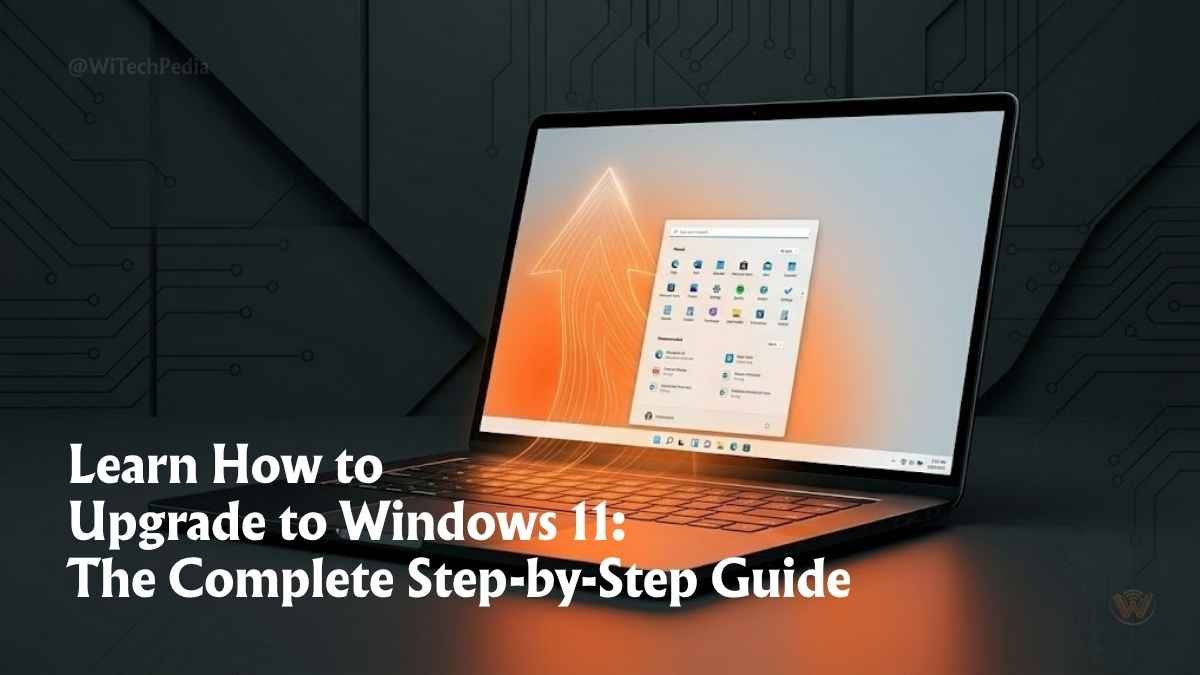
Over 400 million PCs are still running Windows 10 — and the clock is ticking. Microsoft’s official end-of-support date for Windows 10 is October 14, 2025. If you haven’t already made the move, knowing how to upgrade to Windows 11 is no longer optional — it’s essential. The good news? For most users, it’s completely free, takes under an hour, and the process is simpler than you might think.
This guide walks you through every step: checking compatibility, preparing your system, and completing the upgrade — whether you’re a first-time upgrader or a power user who wants to do it right.
- What Is Windows 11 — And Why Upgrade?
- Windows 11 System Requirements: Does Your PC Qualify?
- Step 1 — Check Windows 11 Compatibility
- Step 2 — Back Up Your Data (Non-Negotiable)
- Step 3 — How to Upgrade to Windows 11 (Four Methods)
- Method Comparison: Which Should You Choose?
- Step 4 — What to Do After the Upgrade
- Can You Upgrade to Windows 11 Without TPM 2.0?
- Upgrading Without Losing Data: Key Safeguards
- Frequently Asked Questions
- The Bottom Line: Upgrade with Confidence
What Is Windows 11 — And Why Upgrade?
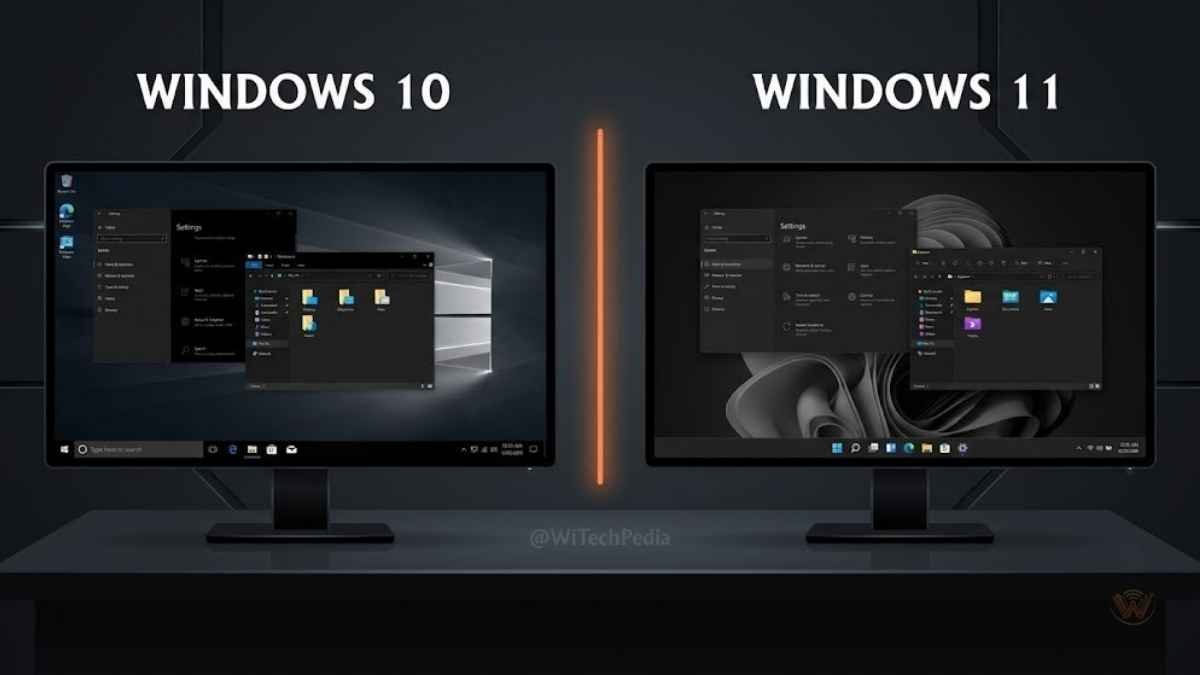
Windows 11 is Microsoft’s current-generation desktop operating system, launched in October 2021. It delivers a redesigned Start Menu, enhanced multi-tasking with Snap Layouts, native Android app support, improved DirectStorage for gaming, and deeper integration with Microsoft 365 and Teams.
Beyond aesthetics, Windows 11 is built around modern security architecture, requiring TPM 2.0 and Secure Boot — hardware-enforced protections that Windows 10 never mandated. If you care about your PC’s long-term security posture, upgrading is the logical move.
Windows 11 System Requirements: Does Your PC Qualify?
Before you know how to upgrade to Windows 11, your hardware must clear Microsoft’s minimum bar. These are stricter than Windows 10’s — notably the TPM 2.0 requirement, which trips up many older machines.
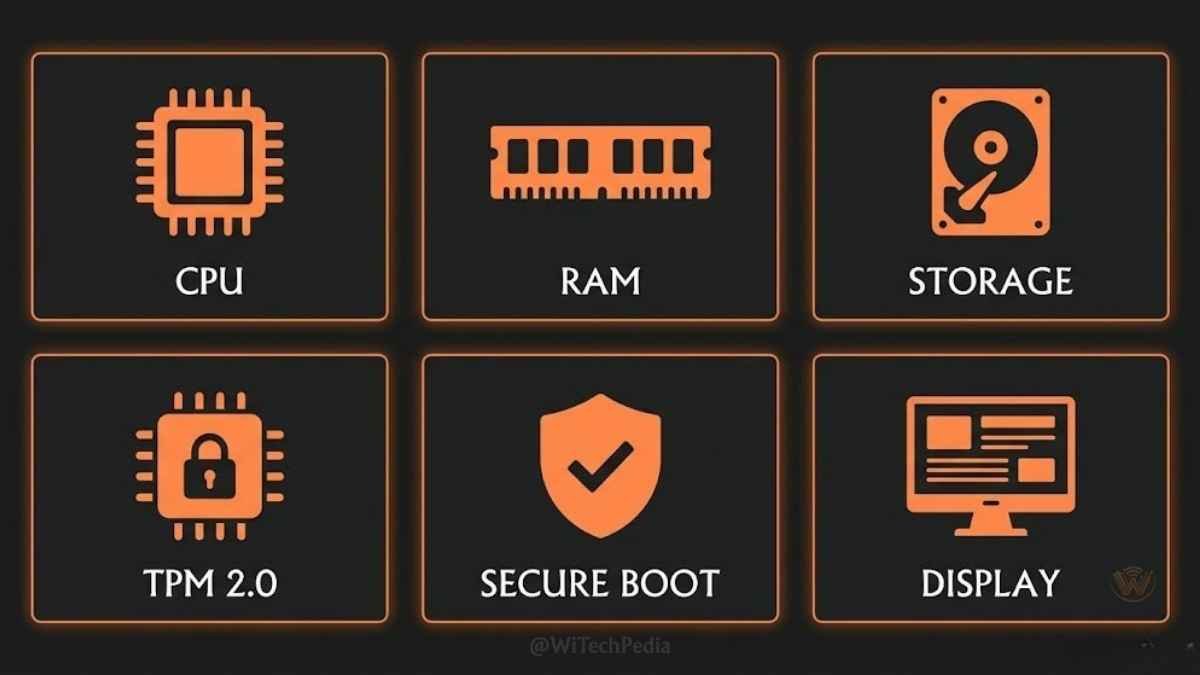
Minimum System Requirements
| Component | Minimum Requirement |
|---|---|
| Processor | 1 GHz or faster, 2+ cores, 64-bit compatible |
| RAM | 4 GB |
| Storage | 64 GB free disk space |
| Firmware | UEFI, Secure Boot capable |
| TPM | Trusted Platform Module (TPM) version 2.0 |
| Graphics | DirectX 12 compatible / WDDM 2.0 driver |
| Display | 720p, >9″ diagonal, 8 bits per colour channel |
| Internet | Required for initial setup (Home edition) |
Key insight: The TPM 2.0 requirement is the most common compatibility blocker. Many PCs manufactured before 2018 either lack TPM 2.0 or have it disabled in BIOS. This is fixable — see the section below.
Processors That Support Windows 11
Microsoft maintains an official CPU compatibility list. In general:
- Intel: 8th Gen Core (Coffee Lake) and newer
- AMD: Ryzen 2000 series and newer
- Qualcomm: Snapdragon 850 and newer
Older CPUs — Intel 7th Gen, AMD Ryzen 1000 — are officially unsupported, though workarounds exist (covered below).
Step 1 — Check Windows 11 Compatibility
Checking Windows 11 Compatibility is the most important part before you try to upgrade to Windows 11. There are several ways you can do that and all the important methods are mentioned bellow.
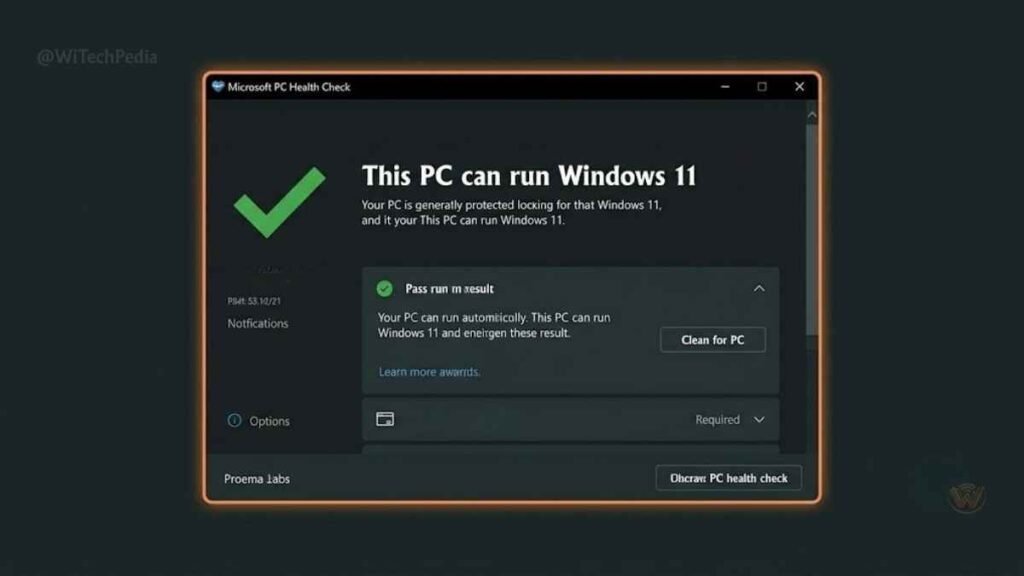
Using the PC Health Check App
Microsoft’s free PC Health Check app is the fastest way to verify compatibility.
- Download PC Health Check from Microsoft.
- Install and launch it.
- Click “Check now” under Introducing Windows 11.
- The app returns a pass/fail result with specific reasons for any failure.
Manual Compatibility Check
If you prefer not to install an app, check these settings manually:
Check TPM version:
- Press
Win + R, typetpm.msc, press Enter. - Under TPM Manufacturer Information, look for Specification Version: 2.0.
- If it shows 1.2 or “Compatible TPM cannot be found,” check your BIOS settings.
Enable TPM 2.0 in BIOS (if disabled):
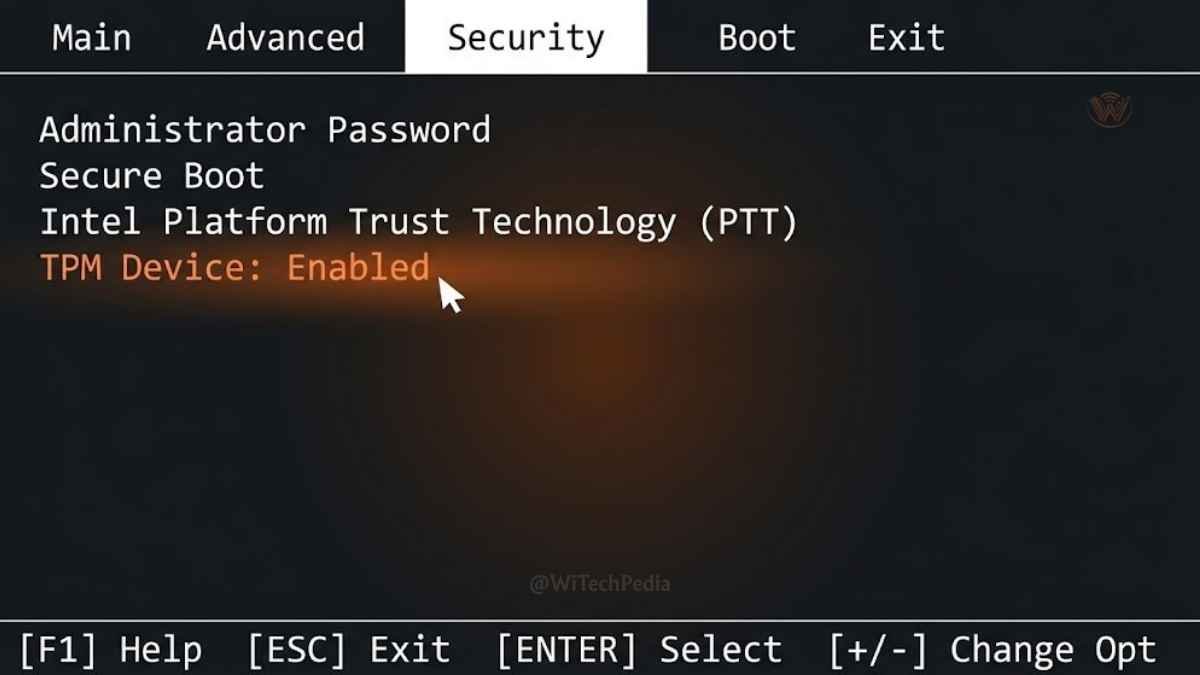

- Restart your PC and enter BIOS/UEFI (typically
Del,F2, orF10on boot). - Navigate to Security or Advanced settings.
- Look for PTT (Intel), fTPM (AMD), or TPM Device and enable it.
- Save and exit.
Check Secure Boot:
- Press
Win + R, typemsinfo32, press Enter. - Under System Summary, look for Secure Boot State: On.
- If Off, enable it in BIOS under Boot settings — but ensure your drive uses GPT partitioning first.
Step 2 — Back Up Your Data (Non-Negotiable)
Upgrades rarely go wrong, but “rarely” isn’t “never.” Back up before you proceed.
Recommended Backup Methods
- Windows Backup (built-in): Settings → Update & Security → Backup → Add a drive. Simple and free.
- OneDrive: Sign in and enable folder backup for Documents, Desktop, and Pictures.
- Macrium Reflect Free: Creates a full system image you can restore if anything breaks. Highly recommended for power users.
- External Drive: Manual copy of critical files to a USB drive or external HDD.
Back up at minimum: Documents, Desktop, Downloads, browser bookmarks, and any software licence keys.
Step 3 — How to Upgrade to Windows 11 (Four Methods)
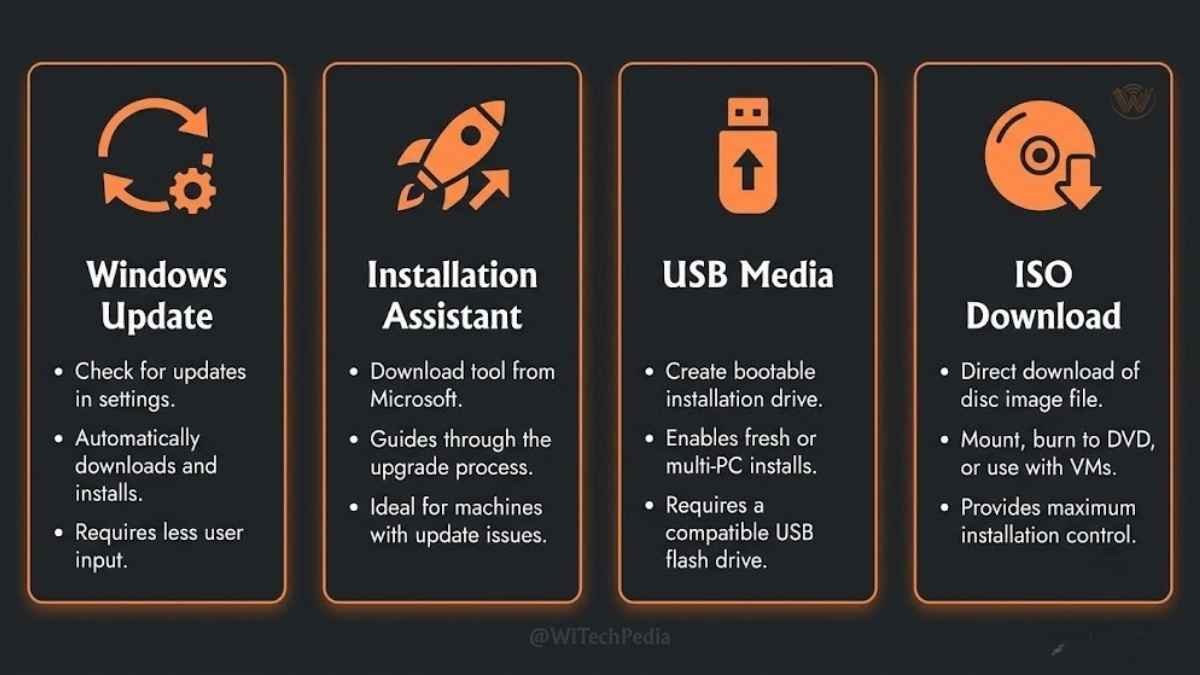
There are four official paths to upgrade from Windows 10 to Windows 11. Choose the one that fits your situation.
Method 1: Windows Update (Easiest — Recommended for Most Users)
If your PC is compatible, Microsoft will offer the upgrade directly through Windows Update. This is the smoothest path — it preserves all your files and apps.
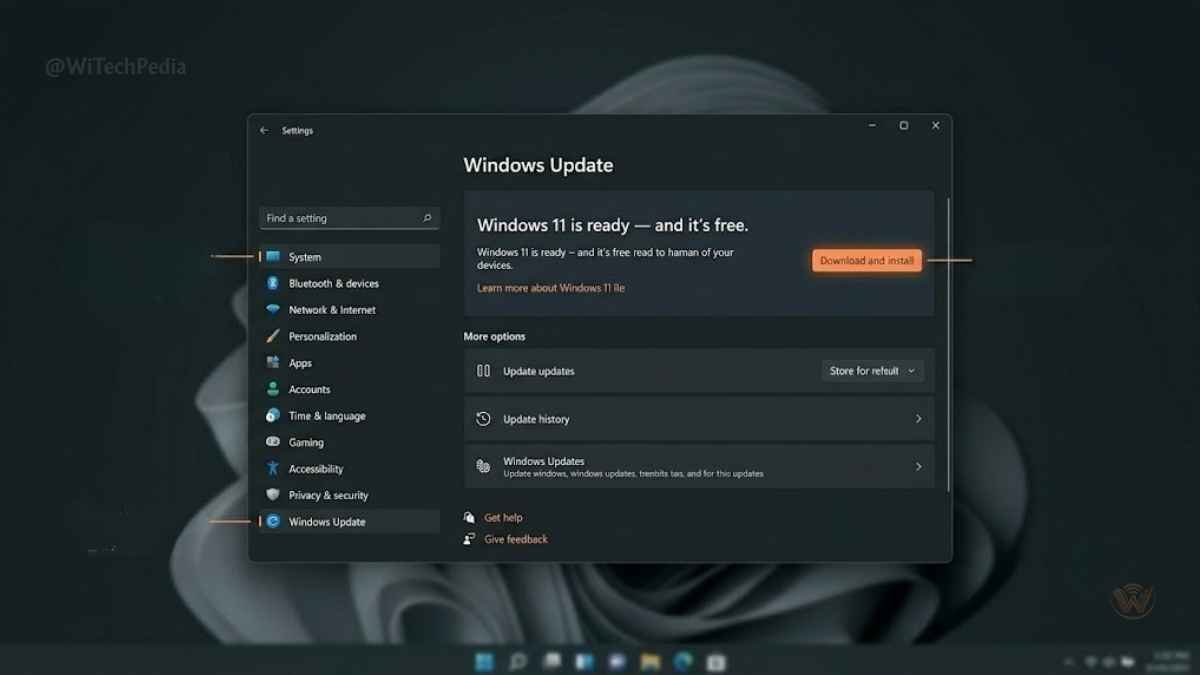
- Open Settings → Windows Update.
- Click Check for updates.
- If eligible, you’ll see “Windows 11 is ready — and it’s free.”
- Click Download and install.
- Your PC will download the update, restart, and complete installation automatically.
- Expect 30–60 minutes depending on your internet speed and hardware.
Pro tip: If you don’t see the offer yet, your PC may be in a phased rollout. Use Method 2 to upgrade immediately.
Method 2: Installation Assistant (Immediate Upgrade)
The Windows 11 Installation Assistant forces the upgrade immediately, bypassing rollout queues.
- Visit microsoft.com/en-us/software-download/windows11.
- Download the Windows 11 Installation Assistant.
- Run it as Administrator.
- Accept the licence terms and click Accept and install.
- The tool downloads Windows 11 and begins installation.
- Your PC will restart several times — leave it running.
Files, apps, and settings are preserved with this method.
Method 3: Create Installation Media (USB Drive)
Use this method to do a clean install, upgrade another PC, or keep an installation USB for future use.
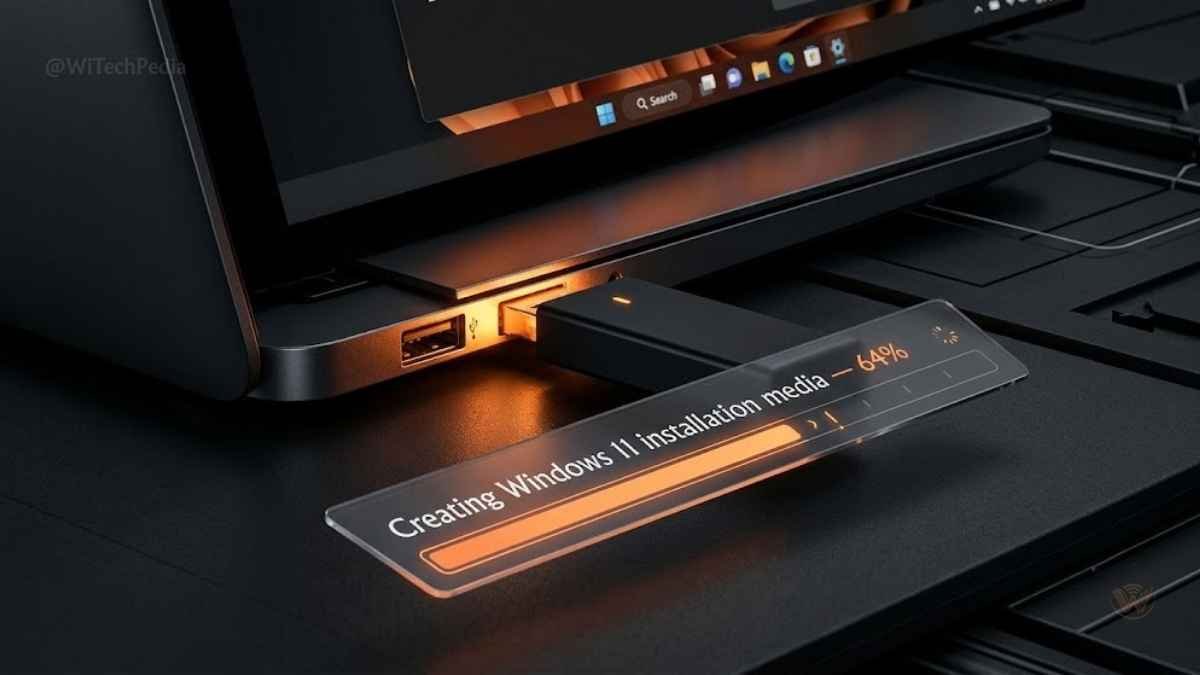
What you need: A USB drive of 8 GB or more (all data on it will be erased).
- Download the Media Creation Tool from microsoft.com/software-download/windows11.
- Run it and select Create installation media for another PC.
- Choose language, edition, and architecture (64-bit).
- Select USB flash drive and follow the prompts.
- Once complete, plug the USB into your target PC, restart, and boot from USB.
- Choose Upgrade this PC to keep files, or Custom install for a clean slate.
Method 4: Download the Windows 11 ISO
For advanced users who want maximum control — multi-boot setups, virtual machines, or offline deployment.
- From the Windows 11 download page, scroll to Download Windows 11 Disk Image (ISO).
- Select Windows 11 (multi-edition) and your language.
- Download the ISO (approximately 5.4 GB).
- Mount the ISO (double-click in Windows 10) and run
setup.exe. - Or burn it to DVD / write to USB with Rufus.
Method Comparison: Which Should You Choose?
| Method | Keeps Files & Apps | Internet Required | Best For |
|---|---|---|---|
| Windows Update | ✅ Yes | ✅ Yes | Most home users |
| Installation Assistant | ✅ Yes | ✅ Yes | Users tired of waiting for rollout |
| USB Media Creation | ✅ Optional | For download only | Clean installs, IT admins |
| ISO Download | ✅ Optional | For download only | Power users, VMs, multi-boot |
Step 4 — What to Do After the Upgrade
Once Windows 11 is installed, take these steps before diving in.
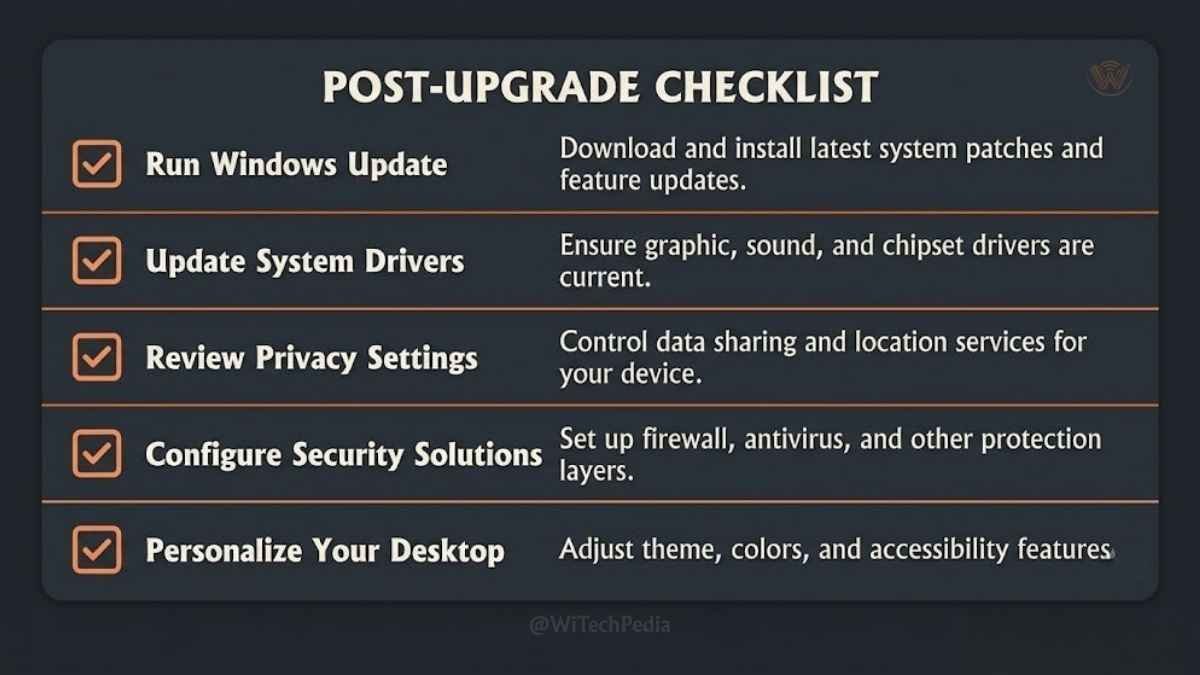
Immediate Post-Install Checklist
- Run Windows Update again — additional driver and security updates will be queued.
- Reinstall or update drivers — graphics, audio, and chipset drivers should come from your GPU and motherboard manufacturer’s websites.
- Reactivate Windows if needed — Windows 11 inherits your Windows 10 digital licence. If it doesn’t activate automatically, go to Settings → System → Activation and click Troubleshoot.
- Restore your backup — copy your files back if you did a clean install.
- Review privacy settings — Settings → Privacy & Security → review each category.
- Explore new features — Snap Layouts, Virtual Desktops, and the redesigned Settings app are worth your time.
Can You Upgrade to Windows 11 Without TPM 2.0?
Officially, no. Unofficially — yes, with caveats.
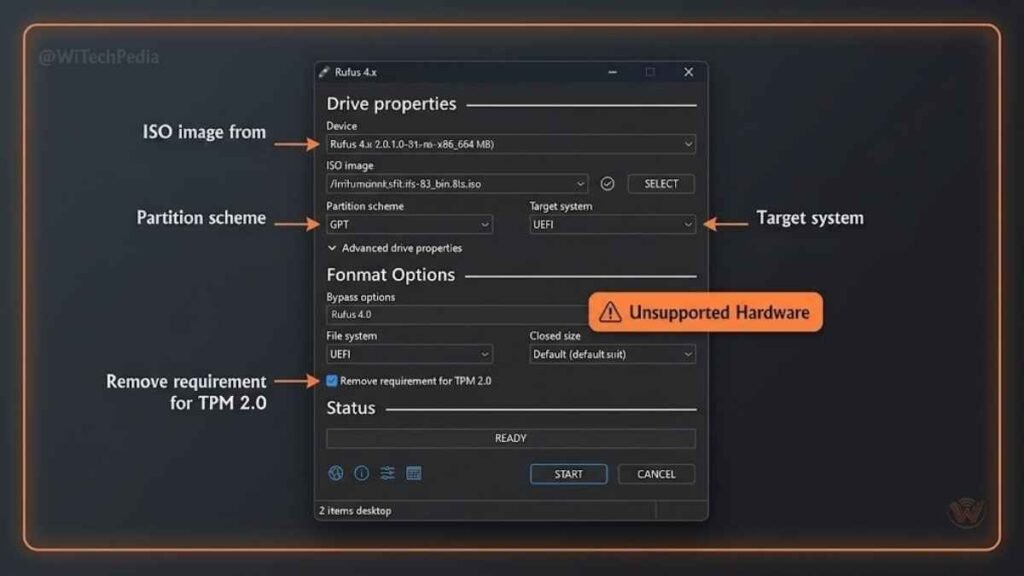
Microsoft’s Rufus workaround and a registry bypass allow installation on unsupported hardware. The process involves either:
- Rufus (recommended bypass method): When creating a USB, Rufus offers an option to remove TPM/Secure Boot/RAM requirements. This is the cleanest approach.
- Registry edit during setup: Add
DWORD LabConfig\BypassTPMCheck = 1andBypassSecureBootCheck = 1during installation.
The trade-offs of running Windows 11 on unsupported hardware:
- Microsoft explicitly states these PCs “are not entitled to receive updates” — though in practice, updates have continued delivering to bypassed installs.
- No warranty or support from Microsoft.
- Potential stability issues as Windows 11 matures.
WiTechPedia’s take: If your CPU is Intel 7th Gen or AMD Ryzen 1000 and your machine is otherwise capable, the Rufus bypass is a pragmatic choice for extending hardware life. Understand the risks and make the call for your situation.
Upgrading Without Losing Data: Key Safeguards
When upgrading Windows 10 to Windows 11, the in-place upgrade method (Methods 1, 2, and the “Upgrade this PC” option in Method 3) retains:
- ✅ All personal files and folders
- ✅ Installed applications
- ✅ Settings and preferences
- ✅ Browser bookmarks (via synced browsers)
What you may need to reconfigure:
- Default app associations
- Some system tray apps that don’t auto-start
- VPN clients and security software (often require reinstallation)
Frequently Asked Questions
Is the Windows 11 upgrade free from Windows 10?
Yes. Microsoft offers a free upgrade to Windows 11 for all Windows 10 PCs that meet the minimum hardware requirements. The licence transfers automatically — you do not need to purchase a new product key. The upgrade is delivered via Windows Update or the Installation Assistant from Microsoft’s official download page.
How long does it take to upgrade to Windows 11?
Typically between 30 minutes and 2 hours depending on your internet speed, processor speed, and available RAM. The download is approximately 4–5 GB. After downloading, the installation phase takes 20–45 minutes and requires two to three restarts. Do not power off your machine during installation.
Will upgrading to Windows 11 delete my files?
No — if you use the in-place upgrade path (Windows Update, Installation Assistant, or “Upgrade this PC” via USB). Your files, applications, and settings are preserved. Only a clean install (choosing “Custom” during setup and formatting your drive) will delete your data. Always back up regardless.
What is TPM 2.0 and why does Windows 11 require it?
TPM (Trusted Platform Module) 2.0 is a dedicated security chip or firmware feature that stores encryption keys, certificates, and credentials in hardware — isolated from your main processor. Windows 11 requires it to enable features like Windows Hello facial recognition, BitLocker drive encryption, and Secure Boot verification. It significantly raises the bar against firmware-level attacks. Most PCs made after 2017 have it — it may just need to be enabled in BIOS.
Can I go back to Windows 10 after upgrading?
Yes, for a limited window. After upgrading, Windows 11 keeps a copy of your previous Windows 10 installation for 10 days. To roll back: Settings → System → Recovery → Go back. After 10 days, Windows automatically deletes the recovery partition to free up disk space. After that point, rolling back requires a clean reinstall of Windows 10 from installation media.
What happens to Windows 10 after October 2025?
After October 14, 2025, Microsoft will no longer provide free security updates, bug fixes, or technical support for Windows 10. Your PC will continue to function, but any new vulnerabilities discovered after that date will remain unpatched — making it a security liability, especially on internet-connected machines. Extended Security Updates (ESU) will be available for business customers at a cost.
The Bottom Line: Upgrade with Confidence
Upgrading to Windows 11 is one of the most impactful things you can do for your PC’s security, performance, and longevity in 2024 and beyond. Here are the key takeaways:
- Check compatibility first — use the PC Health Check app or verify TPM 2.0 and Secure Boot manually.
- Back up your data — always, before any OS change, even an in-place upgrade.
- Choose your method wisely — Windows Update for simplicity, Installation Assistant to skip the queue, USB/ISO for clean installs or advanced setups.
- Unsupported hardware isn’t a dead end — the Rufus bypass extends the life of capable older machines, with known trade-offs.
- Post-install hygiene matters — update drivers, run Windows Update again, and review privacy settings before settling in.
Windows 11 is the future of Microsoft’s desktop platform. The upgrade path is well-worn, stable, and free for most users. There’s never been a better time to make the move.
Found this guide helpful? Subscribe to the WiTechPedia newsletter for more in-depth how-to guides, OS comparisons, and tech explainers delivered straight to your inbox.